If you’re an Amazon private-label seller, you’ve probably been here:
You have a great-looking product image (a photo, a render, even an AI image). You send it to a factory for pricing. The reply comes back with a dozen questions you can’t answer. Or worse, you rush into tooling and pay for a mold that produces something close, but not what you wanted.
This guide shows the safer path. It’s not “more complicated.” It’s just the sequence that prevents expensive mistakes.
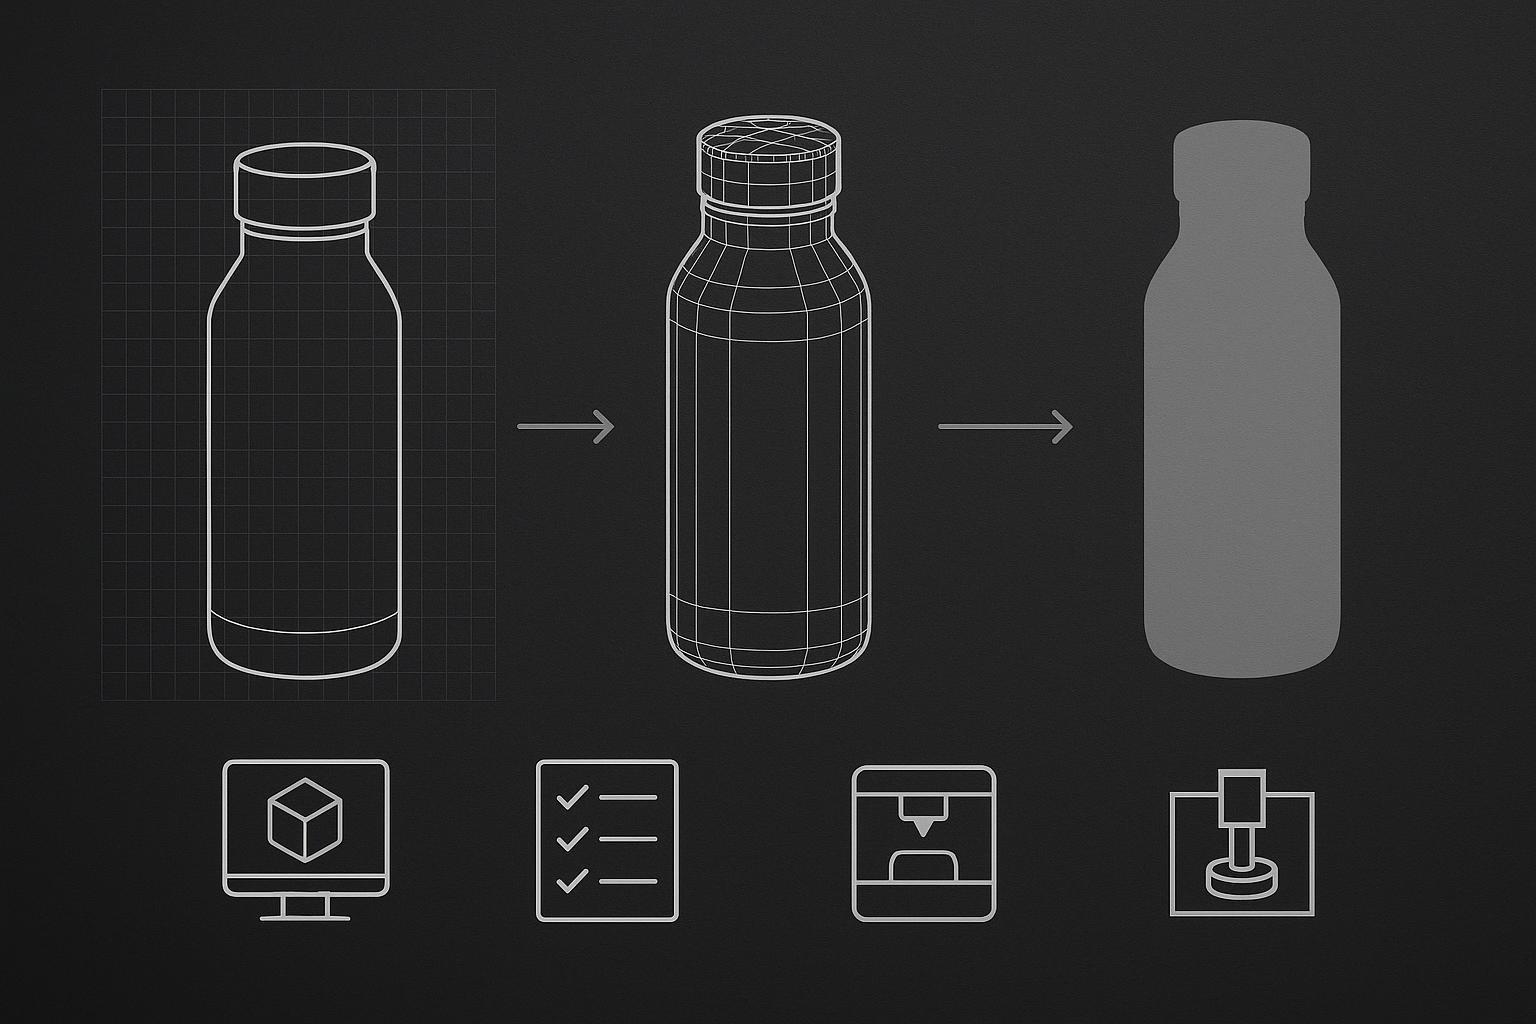
The custom drinkware product development process in 4 steps
Step 1: 2D image to 3D CAD modeling (what the factory is really doing)
A factory’s engineering team will turn your image into a real 3D structure using CAD tools (you’ll often hear filenames like STEP/STP or IGES as the output).
What you need to provide (because the image can’t):
-
Capacity (for example, 500 ml vs. 750 ml)
-
Mouth diameter and thread style (wide mouth vs. narrow, screw thread vs. press-fit)
-
Lid details the picture hides: texture, grip features, gasket shape, straw opening, venting
-
Bottom details: anti-slip ring, concavity, or flat base
-
Any “must-fit” constraints: car cup holder diameter, backpack side pocket width
Pro Tip: If your image is AI-generated, assume at least 3–5 details are physically unclear (or physically impossible) until an engineer rebuilds it in CAD.
Step 2: DFM review (DFM for stainless steel water bottle designs)
DFM is the manufacturability check. Engineers look at your shape and decide whether it can actually be produced with the planned process.
For drinkware, the process depends on the product:
-
Stainless steel vacuum bottles often involve metal forming + welding + vacuum sealing steps.
-
Glass components require glass-forming constraints (and different tolerances and testing).
Common reasons a “cool design” fails DFM:
-
Undercuts or sharp internal geometry that can’t release from a mold
-
Walls that are too thin or too thick for stable forming
-
Threads, spouts, or lid engagement that can’t hold tolerance consistently
⚠️ Warning: Some shapes look fine in a render, but can’t demold. If your supplier suggests small geometry changes, that’s often a sign they’re trying to save your tooling budget.
Step 3: 1:1 prototype (3D printing prototype before tooling)
Before anyone cuts steel, get a physical prototype. This can be a resin 3D print, a CNC sample, or a pre-production sample depending on what you’re validating.
What the prototype should answer:
-
Does it feel right in-hand (diameter, balance, grip)?
-
Does the lid seal and open/close the way you expect?
-
Do the parts align (threads, gasket compression, straw fit)?
-
Is the finish what you meant (matte vs. gloss, texture, color match)?
Many manufacturers explicitly structure their workflow around sample approval before tooling or bulk production. For example, one OEM/ODM workflow highlights “prototype or pre-production sample development” and “sample approval before tooling or bulk production” as a formal stage in the OEM/ODM customization process.
Step 4: tooling (the mold) + pilot run
Once the prototype is correct, tooling starts. This is where your biggest cost and time risk lives.
After tooling, a responsible workflow includes a small pilot run before full scale. A typical process includes “small batch pilot production before scale-up,” plus “in-process QC & final AQL inspection,” as described in that OEM/ODM customization workflow.
The spec sheet you should send with the image
A single image is a conversation starter. A spec sheet is what gets you accurate quoting, faster sampling, and fewer misunderstandings.
Here’s a practical checklist you can paste into an RFQ email.
A. Materials and construction
-
Construction type: double-wall vacuum stainless, single-wall stainless, glass liner + steel shell, etc.
-
Stainless grade requirement (if applicable): SUS 304 vs. 316
-
Plastic/silicone contact parts: call out “food-contact safe” and the market you’ll sell in (US/EU)
B. Surface finish and appearance
-
Finish type: powder coating (matte), high-gloss paint, brushed stainless, etc.
-
Color targets: Pantone (or a physical sample reference)
C. Logo method (and where it goes)
-
Method: laser engraving, silk screen, heat transfer, emboss/deboss, molded-in mark
-
Placement: side, lid, bottom
If you need a quick overview of options, use a reference page like logo customization options to align on methods before sampling.
D. Lid and accessory details
-
Lid type: handle, flip-top, straw lid, screw cap
-
Gasket material and whether you need spare gaskets
-
Any mixed materials: bamboo/wood top, silicone wrap, metal handle
E. Packaging and compliance (early, not last-minute)
-
Unit packaging: polybag, color box, insert card
-
Drop test expectations (especially for FBA)
-
Regulatory needs: define your must-haves (don’t assume your supplier guesses)
Cost and timeline: realistic ranges (drinkware tooling cost and lead time)
Tooling, sampling, and lead time vary a lot by structure and how “new” the design is.
Tooling cost (typical ranges)
-
If the body is standard and you’re changing a lid or a small component, tooling can be in the low thousands of RMB.
-
For a truly new, non-standard body shape or multi-material structure, total tooling can move into tens of thousands of RMB.
Timeline (typical ranges)
-
CAD + prototype: roughly 1–2 weeks for an initial pass
-
Tooling build: often 3–5 weeks
-
First production batch after tooling: often 3–4 weeks
What makes it longer:
-
Too many unknowns (no spec sheet, unclear dimensions)
-
Finish matching iterations
-
Lid leak issues discovered late
-
Packaging added after sampling
Use AI images the right way: build a “multi-angle pack”
If your starting point is an AI image, your goal isn’t to impress the factory. It’s to remove ambiguity.
Create a simple reference pack with:
-
Front
-
Side
-
Bottom
-
Top-down
-
A rough cross-section (even a sketch)
The faster an engineer understands what you mean, the fewer sampling loops you’ll pay for.
IP basics: NDA and mold ownership (not legal advice)
If your design is original, don’t treat protection as an afterthought.
Before sharing detailed files, use an NDA that clearly defines:
-
what counts as confidential (drawings, CAD, prototypes, specs)
-
that the supplier can use your information only to develop your product
-
what happens at the end of the project (return/destroy materials)
For projects with paid tooling, it’s also common to address mold/tooling ownership in writing, including whether the supplier may use the tooling (or your design) for any other customer. If you’re searching for background reading, Harris Sliwoski’s overview of overseas manufacturing contracts: OEM, CM and ODM is a solid starting point on why “manufacturing NDA mold ownership” language matters.
FAQs
Can I skip prototyping and go straight to tooling?
You can, but it’s the fastest way to turn a small misunderstanding into a very expensive one. If the lid seal, grip, or finish isn’t what you pictured, tooling rework will cost far more than a prototype loop.
What if my design combines glass and stainless?
Treat it as two manufacturing problems that must still assemble cleanly. Expect different tolerances, different testing, and longer sampling. If you’re exploring glass options, look at a category reference like glass tumbler options to align on what’s feasible before committing.
What’s the single most important thing to send a factory?
A spec sheet with the non-negotiables: capacity, key dimensions, materials, lid mechanism, finish, and logo method. The image alone won’t carry those decisions.
Next step
Save this page and copy the spec checklist into your next RFQ email. If your supplier replies with fewer questions and a tighter quote, you’ll know you’ve removed the ambiguity that causes the most delays.